

You’ve probably heard a thing or two about A/B testing and how it can help you funnel your site’s visitors where you want them to go and get a better reaction to your CTAs. There are quite a few steps involved in both setting up and understanding A/B testing.
Optimizing your conversion rate can mean the difference between good sales and flat-lined sales.
What Is A/B Testing?
A/B testing is also called split testing. What you do is create two different versions of a webpage and test them to see which is more successful for your goals. To get the most from your testing, you’ll want to stick with one or two variables at a time.
An example would be a landing page where your goal is to get visitors to sign up for your newsletter. You might create one landing page that has a bright orange button that says, “Free Newsletter” and another page that has a bit of information, an image and the orange button.
Your goal is to see which landing page is most successful in getting people to sign up. You will then make this the permanent landing page on your site when trying to gather subscribers.

The graphic above shows how the A/B testing model works. Half of your visitors are directed to page A and half to B. There is only one difference in the two samples and that is the color of the Call to Action box. You then track results to see what conversion is for each variation.
Of course, getting people to sign up for your newsletter is only one thing you might test. Other things you can test with A/B testing include:
- Effective funneling (getting the visitor from Point A to Point B)
- Selling a product or service
- Getting visitors to read more information
- Getting referrals
- Gaining social media shares
The cost of getting new visitors to your website can be high. Whether you use advertising, social media campaigns, or other forms of promotion, they all take time and money.
However, increasing the conversion rates for visitors you already have can be equally inexpensive. It only makes sense to spend a little time doing some testing and converting your visitors into customers.
Complete Step-By-Step Guide
1. Deciding What To Test
When it comes to A/B testing, you can test anything on your website. For example, you could test:
- Headlines
- Subtext
- Content
- Call to action wording
- Call to action colors
- Call to action placement
- Different images
- Image placement
- Reducing images
- Increasing images
- Load times
- Social media button placement
- Social media shares
- Testimonials
- Product descriptions
- Website layout
- Website style
- Promotional offers
- Product pricing
- Amount of space around CTA button
- Popups
- Different offers
The key to getting a solid set of A/B tests is to figure out what your ultimate goal is. Only by knowing what your goal is will you have an idea what to test.
Do you want to know how well a CTA button works in getting visitors to order your product? Then you’ll want to test the wording of the button, placement on the page, color, fonts, etc.
2. Watch Out For SEO Issues With Testing
Some people are reluctant to conduct A/B testing for fear of getting penalized by Google. However, as long as you are careful how you do the testing, Google shouldn’t knock you down in search engine rankings.
One issue that Googlebot has with sites is when a site shows one page to site visitors and another to the Googlebot. Google calls this “cloaking” and it is a big no-no. Here is what Google Webmaster Central has to say on this point:
“Cloaking—showing one set of content to humans, and a different set to Googlebot—is against our Webmaster Guidelines, whether you’re running a test or not. Make sure that you’re not deciding whether to serve the test, or which content variant to serve, based on user-agent.”
As long as you don’t have your site set to show Google only the original page, you should be fine. However, if you do set your page to do that, your site could be demoted or even removed from Google search results. That probably isn’t the end result you’re looking for when doing split testing.
Google also mentions that if you are doing testing that has multiple URLs, you can use the rel=”conical” link attribute in all but the original URL. This tells the bot that your intention is simply to do testing and also signals not to index the other pages, which may be temporary in nature. You simply add this reference in your redirect language.
Google Webmaster Central also mentions that you should be using a 302 redirect, which is a temporary redirect and not a 301 redirect, which is permanent. This also signals to search engines that you are testing or putting this in place temporarily but that it will not be permanent. This will keep them from replacing your permanent URL with a temporary one as well.
Finally, the site suggests only running the testing as long as you must to get your results. The shorter amount of time the better so that Google doesn’t penalize you.
3. Tracking Results
Although it is smart to keep testing as short as possible, you also need to allow enough time to get a good sample. If you get high traffic on your site, then you may be able to limit your testing to just a few short days. However, if you are like most small businesses, you’ll likely need to test a bit longer to get an appropriate sample to study. Two weeks is a good rule of thumb, but adjust accordingly based on the number of site visitors you are seeing.
There are a few ways to track results.
- Site Analysis Tools: Most servers allow you access to a control panel where you will fine statistics on site visitors. You’ll be able to see what page visitors are entering your site on and where they go from there. If your goal is to get them to click on a link for more information, then you simply see how many traveled from Point A to Point B.
- Google Analytics: Probably one of the safest ways to test is to use Google’s Analytics to do experiments on your website. Below are some screenshots of how Analytics’ content testing platform works.
To use Google Analytics, go to your Google Analytics account or set up a new one – here are the instructions (see image).
Navigate to BEHAVIOR/EXPERIMENTS > Choose “Create Experiment” > Name your experiment.


You’ll also want to choose:
- Metric: You can measure the number of bounces or people leaving the site after landing on a page. The number of Pageviews (overall views) or the Session duration or how long someone stays on your site.
- Percentage of Traffic to Experiment on: You can choose anywhere from 1 to 100 percent. If you are a beginner, 100 percent is a good starting point.
- Advanced Options: You can also choose from some advanced options, such as whether to distribute the traffic evenly across all the different variations of the testing, how long the experiment will run and a confidence threshold. This is simply the percentage you want a winner to be before you choose that result. You could set this to 50 percent or 95 percent. The choice is yours.
Once you’ve completed these selections, click the Next button to move on to the configuration of your experiment.

This page allows you to plug in the information about your original page and landing pages or variations you want to test. As mentioned above, you can test more than one and there really doesn’t seem to be any impact on how effective the testing is with multi-armed variations.
Punch in the website pages you want to conduct the experiment on and name them. You can simply name one “A,” for example, or “Variation 1.”
As you plug in the URLs, a preview should appear to the right. To show you what I mean, I plugged in the main WHSR page and a preview appeared (image below).

If you’re reading this article, I’m going to assume you will insert your own code into your website. The next set allows you to choose “manually insert code” (image below).
Once you choose this option, a box will pop up with HTML code you can copy and place in the head tag on your web pages.
All pages involved in the experiment should have this code.

Once the code is installed click “Next” and then “Review and Start.” If your code is not installed correctly, Analytics will notify you at this time.
Should you need to troubleshoot, check that all the code was copied and pasted correctly and that it is placed in the header of each page.
4. Analyzing Results
You can watch the progress of your experiment as it goes along. If it is clear early one that one variable is a clear winner, you can stop the experiment at that time. Otherwise, conduct the testing for the allotted time and see what happens.
Keep in mind that test results can be sporadic. It is best to let the test run through the full two weeks to get a more accurate result. If you’re not sure how long to run your test, use a calculator such as the one on VWO. This can help you calculate the best length of time to run your own tests.
Don’t get distracted. Remember what you were testing and why. If you are testing to see if content keeps visitors on a page longer, don’t get sidetracked by how many visitors clicked to subscribe to your newsletter. Stay focused, at least for this round.
5. Secondary Testing
Once you finish your initial testing phase, take any clear winners and make changes to your original page. However, you may still want to refine your page some more. There may be other elements you wish to look at or you may want to see if additional options create a better conversion.
Simply go through the same process each time:
- Decide what you want to test
- Create a hypothesis (what do you think will happen when you change ______)
- Set up your landing pages
- Set up your analytics
- Add code to all pages
- Analyze results
- Repeat, repeat, repeat
Case Studies
Still not convinced that A/B testing will work for your site? Here are a few case studies that might help sway you.
Taylor Gifts
Taylor Gifts, an eCommerce website, made some small changes that resulted in huge profits. They redesigned several elements of their product page and found that conversions were increased by 10 percent.
For their part, they used Visual Website Optimizer as their tool of choice to increase their bottom line. They had a firm goal in mind and that was to increase sales.
Kiva

Wishpond took a look at Kiva, a nonprofit that wanted to increase donations from first-time website visitors. Their hypothesis was that adding more info would increase doantions. They saw an 11.5 percent increase simply by adding an info box at the bottom of the page.
Spreadshirt
Spreadshirt saw an increase in click throughs of 606 percent with a simple redesign. The goal? To cross boundaries by offering content in several different languages while still maintaining the engagement of current customers.
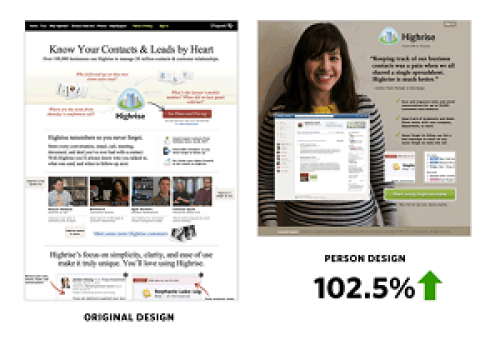
37signals
 Did you know that adding a picture of a real person that the consumer can relate to can increase signups by 102.5 percent? 37signals discovered this little fact when they changed the design of their landing page to add a photo of a young woman and make things more personal.
Weather Channel Interactive
Weather Channel Interactive had one goal in mind with their multiple-variables testing. They wanted to convert visitors to trail subscribers. With a few simple tweaks, they were able to increase conversions by 225 percent.
These are just a few of the examples of different tests and how they turned out. What are your goals? How can you increase conversions? What will you test first?
This article was syndicated from Business 2 Community: How To Conduct A/B Testing On Your Site – A Complete Guide
More Technology & Innovation articles from Business 2 Community:


